
We’ve all been there—sweating bullets, arms flailing, wallpaper slipping everywhere, and that one dreaded air bubble that just won’t smooth out. You step back to admire your work, only to realize your beautiful new wallpaper is slightly crooked. Cue the collective groan. I’ve got a game-changing wallpaper hack for you that will have you looking like a DIY pro: painter’s tape!
This simple hack works wonders for both pasted and peel & stick wallpaper, and while it’s not ideal for pre-pasted wallpaper, it’s an absolute must-try for peel and stick—especially if you want to keep your blood pressure in check. Let’s break it down.
Step 1: Line Up Your Wallpaper Perfectly (Yes, Perfectly!)
If you’ve ever tried hanging wallpaper, you know that the key to success is getting that first strip perfectly straight. Once the first panel is crooked, your whole wall starts looking like one of those funhouse mirrors that you would find in a McDonalds play zone. Enter painter’s tape!
Before you peel off the backing (if you’re using peel & stick), hold up the wallpaper to the wall and take a moment to make sure it’s lined up exactly where you want it. Be meticulous here. Call in a friend. Call in your dog. Or your mom who probably had experience back in the 80’s hanging it. Whatever you need to get those lines perfectly straight.
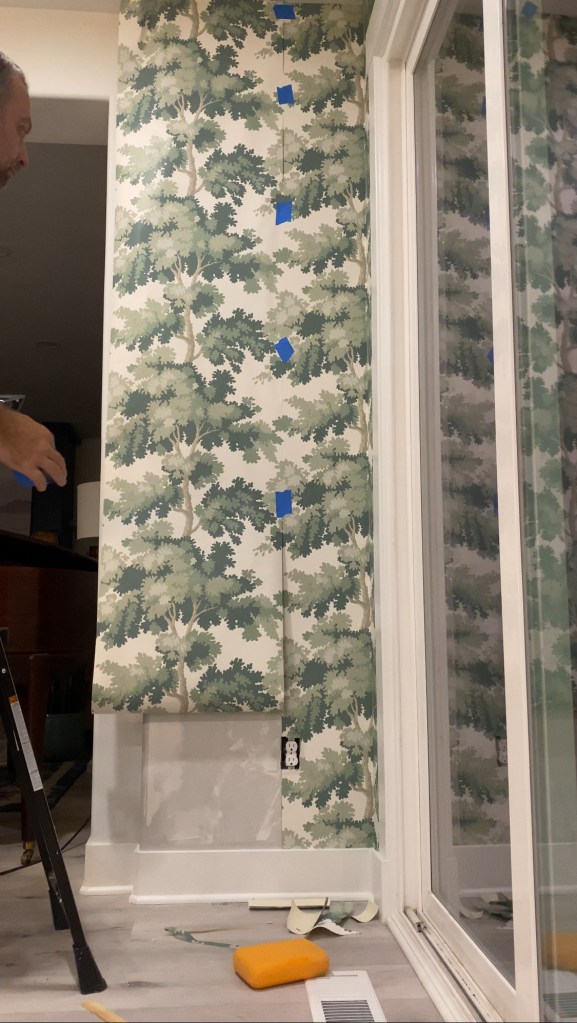
Step 2: Tape It Like a Pro
Once you have your wallpaper lined up perfectly, it’s time to break out the tape! Use painter’s tape to secure the top of the wallpaper strip to the wall. This helps it stay put while you do the rest of the heavy lifting (and trust me, you’ll appreciate the extra hand). The beauty of painter’s tape is that it’s easy to remove without damaging anything—usually.
A word of caution: Be sure to test the painter’s tape on a scrap piece of wallpaper first, especially with peel & stick or any type of renewable wallpaper. Some wallpaper brands are a little more delicate than others, and the last thing you want is to peel off the pattern along with the tape! Imagine explaining to your significant other why you’re stuck with a half-ripped flamingo wallpaper for the next year.
Step 3: Peel (If You Must) & Stick with Confidence
Now that your wallpaper is secure, you can tackle the next part without panicking. For peel & stick wallpaper, leave the backing intact while you use the tape to hold your wallpaper in place. When it’s perfectly aligned, start peeling the backing away slowly as you smooth the paper down the wall. It’s like peeling a banana—take your time. No one likes a rushed banana.
For traditional wallpaper, the painter’s tape helps you keep everything aligned while you’re applying the paste or smoothing it out. Think of the tape as your backup, a silent partner in crime. You can remove it once your wallpaper is firmly in place, but not a moment before.
A Quick Note on Pre-pasted Wallpaper
As much as I love this hack, it’s not quite as effective with pre-pasted wallpaper. Since you have to activate the adhesive with water, the tape doesn’t always stick to it as nicely. Pre-pasted wallpaper has its own rhythm (and often, its own mess), so feel free to skip the tape on those projects and rely on your trusty leveling skills.
Final Thoughts: The Tape Is Your Friend
To wrap things up (pun intended), using painter’s tape as your wallpaper helper is one of those hacks that will save your sanity. It helps you keep those wallpaper lines crisp and straight—whether you’re using peel & stick or pasted wallpaper. Just remember to test the tape first on delicate patterns and materials.
So the next time you’re staring at a roll of wallpaper, dreading the crooked chaos that might ensue, just remember: tape it up! And may your wallpaper adventures be free of bubbles, crooked edges, and, most importantly, tears.

Leave a comment